Follow Me On Social Media!
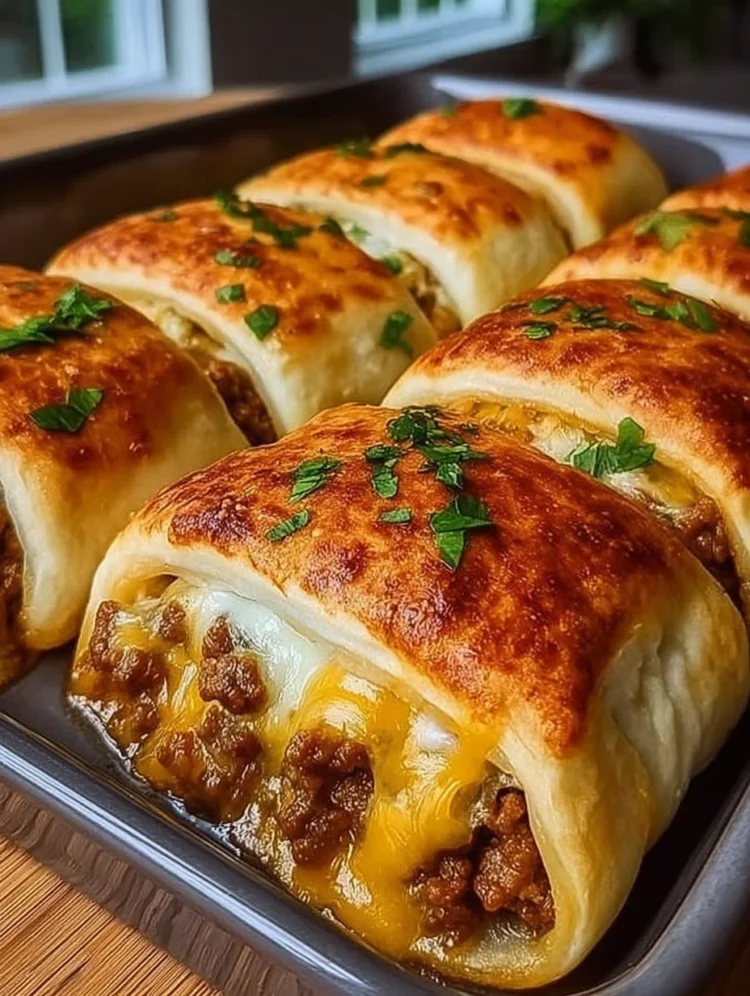
Cheesy Beef-Stuffed Crescent Rolls
If you’ve ever opened a can of crescent roll dough and thought, “Okay, what cozy, snacky magic can we make with this?” — this is the answer. These cheesy beef-stuffed crescent rolls are warm, golden, and wildly comforting, like the best kind of appetizer-meets-dinner situation.
They’re the kind of food that disappears fast. The buttery layers puff up in the oven, the kitchen starts smelling like garlic and seasoned beef, and when you pull them apart… that melted cheese stretch is basically guaranteed. They’re perfect for game day, movie night, an easy family dinner, or anytime you want something hearty but fun — no fork required (unless you’re feeling fancy).
Ingredients
1 pound ground beef
1 tablespoon olive oil
½ small onion, finely diced
2 cloves garlic, minced
1 teaspoon Italian seasoning
½ teaspoon paprika
½ teaspoon salt (or to taste)
½ teaspoon black pepper
1 tablespoon Worcestershire sauce
1 cup shredded mozzarella cheese
½ cup shredded cheddar cheese
1 can (8 ounces) refrigerated crescent roll dough (8-count)
1 egg, beaten (for egg wash)
1 tablespoon chopped fresh parsley (for garnish)
Instructions
1. Make the filling
Heat the olive oil in a skillet over medium heat. Add the diced onion and cook for 2–3 minutes, until softened. Stir in the garlic and cook for about 30 seconds — just until fragrant.
Add the ground beef and cook until browned, breaking it up as you go. Once it’s fully cooked, drain off any excess grease.
2. Season it up
Stir in the Italian seasoning, paprika, salt, pepper, and Worcestershire sauce. Let it cook for another 2–3 minutes so everything blends together and smells amazing.
Remove from heat and let the mixture cool slightly. (This helps the cheese mix in nicely instead of melting instantly.)
3. Add the cheese
Once the beef mixture is warm but not piping hot, stir in the mozzarella and cheddar until evenly mixed. It’ll look a little irresistible already — that’s normal.
4. Assemble the crescent rolls
Preheat your oven to 375°F (190°C).
Unroll the crescent dough and separate into rectangles (pinch the seams together if needed). Spoon a generous amount of the beef-and-cheese mixture into the center of each piece.
Fold and roll the dough around the filling, sealing the edges as best you can. Place them seam-side down in a greased baking dish so they stay tucked and cozy while baking.
5. Brush and bake
Brush the tops with beaten egg for that glossy, bakery-style finish.
Bake for 15–18 minutes, or until the rolls are puffed and deeply golden brown. You’ll know they’re close when the kitchen smells like buttery heaven.
6. Garnish and serve
Let them cool for a minute or two (the filling gets hot). Sprinkle with chopped parsley and serve warm.
Presentation
These look so good right out of the oven, you barely have to try — but a few little touches make them extra inviting:
Serve them on a platter with a sprinkle of parsley and a little extra shredded cheese on the side for flair.
Add a small bowl of dipping sauce next to them (marinara, ranch, garlic butter, or even a spicy ketchup situation).
For the ultimate “pull-apart” moment, slice one open on the plate so the cheesy center is visible.
They’re also great tucked into a basket lined with a clean kitchen towel to keep them warm.
Nutritional Information:
⏰ Prep Time: 15 minutes | Cooking Time: 20 minutes | Total Time: 35 minutes
🔥 Kcal: Approximately 450 kcal per serving (2 rolls)
🍽️ Servings: 4 servings
Conclusion
Cheesy beef-stuffed crescent rolls are one of those recipes that feels almost too easy for how satisfying it is. Crispy, buttery outside. Savory, melty, cheesy inside. And they’re perfect for feeding a hungry crowd — or just treating yourself to something cozy and fun.
If you’ve got 35 minutes and a craving for comfort food, make these soon. Just don’t be surprised if everyone hovers near the oven waiting for the timer to beep.